12.31.2010

Spunky Nature + Blooms!

Hi there! I'm here to show you a super spring-y card today! I don't know about you, but Christmas is over and I'm looking forward to SPRING! Come on warm weather, gardening, and playing outside! I miss you! Doesn't help that my friend Mandy already received her Burpee catalog in the mail and I was already peaking through it and planning my garden. Yes... it is still December... lol. Anyway, I have the spring blooms bug and here's what happens when that happens:


So... I pulled out my new Spunky Nature set from My Cute Stamps. LOVE this set! Full of bold, solid floral and nature images! Very cute, indeed! I stamped the grass/stem image in Versamark ink on Ocean Tides cardstock. Then, I stamped the large stem image on Rustic Cream cardstock with Dark Chocolate ink. To top it all off, I used my new Bloom Builder die to cut the flower with Raspberry Fizz felt- super cute! The sentiment is from PTI's Everyday Button Bits set.

Hope you like it! Thanks for stopping by today!

Steph

SHARE THIS POST - {PINTEREST}

12.29.2010

Tutorial: Grid Scoring

Hey there! I'm checking in today to share with you how I make the grid pattern seen here and here. A couple of you asked for a tutorial on how to achieve this look and here it is! Please excuse my dry hands and chipped nail polish in the pictures! Haha! You know how it is....

First, I use the Martha Stewart Score Board- I love the board! It is broken down into 1/8" increments and that is the size I like my grid pattern. You can very easily make this grid pattern in larger sizes by scoring at different increments. You'll see what I mean when I show you how it's done!


Here I have my MS Score Board with a 5 1/2" by 2 1/4" strip of Ocean Tides cardstock. I lined the cardstock up flush in the corner of the score board. Being sure to hold the cardstock in place, I used the scoring tool to score straight lines every 1/8" for the entire length of the cardstock.


You have to be sure to hold the cardstock securely in place so that you can create straight lines without the paper slipping. Here is a closer look of the lines created with the scoring tool.


Once you complete all the score lines all the way across the length of the cardstock, flip the cardstock around and make sure the cardstock is flush in the corner of the score board again. Holding the cardstock in place, score every 1/8" to complete the grid pattern. 


Here is a closer shot of how the grid pattern is forming. By crossing over the score lines you made initially, you create a great box pattern on the cardstock.


Here is another shot -- you see that I had to readjust my hands to be sure that the cardstock didn't slip while I was scoring.


This is a simple way to add some texture and depth to your card! When I finished scoring this piece, I cut it down the center so I could use it for two different cards. Here is one of the cards I made with this grid scored cardstock.


I paired the Ocean Tides grid pattern paper with Rustic Cream cardstock, Hero Arts Long Stems stamp and the sentiment from Mat Stack 1 Collection. 


And here's another close up of the grid pattern! I'm so glad you all liked the technique -- I hope this helps! Let me know if you have any more questions!

Thanks for stopping by!

Steph


SHARE THIS POST - {PINTEREST}

12.24.2010

Merry Christmas!

Hi, everyone! I just wanted to stop in today to share a couple more Christmas cards before it's too late to share them! The first one is a card I made for the last Paper Crafts magazine call -- obviously, it didn't get picked up, but I still love it a lot!


This one is made with Rustic White cardstock and I played around with some Frayed Burlap Distress Ink and my Inkssentials Blending Tool. I stamped the wreath from Wreath For All Seasons in Dark Chocolate ink and stamped the berries in Pure Poppy and Encore Gold. I love the ribbon detail on this one, too!

Next is the Christmas card I sent out to all my close friends and family this year! I had a blast working on these and they came together super easily thanks to Shutterfly!


Of course, who can pass up a card featuring these little cuties! I guess I am a little biased.... haha!

Thank you all so much for visiting today! I wish you all a very merry Christmas!

Steph


SHARE THIS POST - {PINTEREST}

12.20.2010

Play Date Cafe Challenge #60

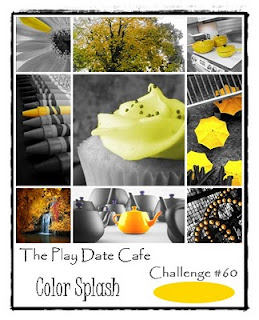
Hey! I'm here today to share a quick card I whipped up for the challenge over at Play Date Cafe. Here is the picture provided for inspiration:


Ok... yellow... not my fave.... it's ok, though! I think I worked it out! To be honest, I really don't know if I worked it out, but I'll play along anyway! HAHA! My lovely sister and my husband said it hurt their eyes.... I'm hoping they just have no design sense..LOL! I happen to love it! Enough suspense, here it is:


Ok, people... it's full of things I love!

Damask Designs -- just got it -- I in love. 
Mat Stack 1 Collection -- in LOVE (can't wait to get Mat Stack 2 Collection). 
Vellum -- always a love.
Satin ribbon -- you know me... haha!

So, there it is- let me know... I'm a little unsure of this one. I'm in love.... others are dizzy... lol.

Steph

SHARE THIS POST - {PINTEREST}

12.19.2010

Friends for Life...

Hi, all! Hope you are all having a great Sunday! My little guy is taking a great nap today so I was able to play around with some challenges! I found this challenge from Skipping Stones Design through Maile Belles blog and thought it would be fun to play along!

Here is the sketch:


And here is my card:


So... I FINALLY pulled out my Larger that Life set- I have been waiting to play with it for a while and finally got around to it! I mixed it with the original Life set to make a wildflower background with black and smokey shadow ink. The frame is Fillable Frames #10 and the sentiment is from Life. I colored the rhinestones with Copics to match the Ocean Tides ribbon. To be completely honest, when I started this card I thought I had Ocean Tides Satin ribbon.... I only had twill tape... I dislike twill tape... lol! It came out OK, though.

Hope you like it! Thanks for stopping by!

Steph


SHARE THIS POST - {PINTEREST}

12.17.2010

Cute little cupcake!

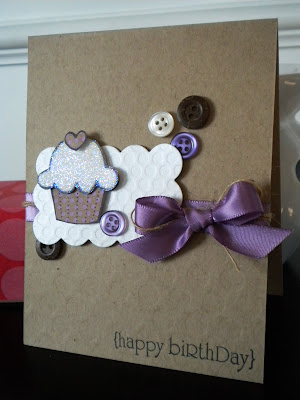
Hey, guys! I don't know about you, but I've about had enough of Christmas cards so today I'm here to share a bright and cheery birthday card with you! When I first got my shipment of My Cute Stamps a couple of weeks ago, the first stamp that jumped out at me was this super cute cupcake- it just screamed glitter and paper piecing to me! I knew exactly what I wanted to do with it the second I saw it! Here's my card:


I love, love, love this Little Cupcake from My Cute Stamps! I stamped it on some Dotty Biscotti patterned paper from Papertrey Ink and cut it out. Then, I stamped the cupcake again on some Shimmer White cardstock and cut out the top of the cupcake. Then, I glitter-fied (is that a word? is now!) it with Prisma glitter! Super, super cute! I adhered the cupcake on a shimmery Fillable Frames #5 die cut that I also ran through the Cuttlebug with the Polka Dot Basics Impression Plate! The sentiment is from the Birthday Bash Sentiments. I also love the look of the Plum Pudding Satin ribbon tied together with the twine! I love mixing the rustic, elegant, and cute elements together! So fun!


Here's a close-up of that super sweet cupcake!

I'm also entering this in the challenge over at Moxie Fab World Glitter is Glam! Check it out- you have until 1/3/2011 to enter!

Thanks for stopping by today!

Steph

SHARE THIS POST - {PINTEREST}

12.16.2010

Cold and dreery....

Ugh... I hate the cold.... and I know I can't really complain because there are so many of you living in below zero temps.... and it's only in the twenties here... but I can't take it anymore! How many more days until Memorial Day? Haha! No school today, speech therapy has been cancelled, icy road conditions... going to be a fun day....

Anyway, I'm here to share a very elegant birthday card today.


I used Background Basics: Tin Types with smokey shadow and aqua mist ink to create the pattern on the bottom of the card. The focal image is from Mat Stack 1 Collection- love this set! I've been using it a lot lately! A satin aqua mist bow finishes it off for a clean and classic look.

Also, I am proud to say the Christmas cards went  out in the mail yesterday! While I can't show you the finished product until Christmas, I can show you a little sneak peek.....


 love felt, love buttons, love twine.... so pretty....

I'm off to go play with these crazy kiddos now! Have a great day!
THINK WARM THOUGHTS!

Steph

FYI: I'll work on a tutorial for you guys who are interested in making a grid with a score board! Be back soon with that! So glad you like the technique!

SHARE THIS POST - {PINTEREST}

12.13.2010

Moxie Fab Challenge

Hey, guys! Long time no see! I've been plugging away at my Christmas chores... haha! I hate to call them chores, but there is just so much still to do! Anyway, I decided to take a break today and share some cards for the challenges over at Moxie Fab World. Today is the last day to play along! Hurry up and get your entries in! This card is for the Card Creations: Favorite Occasions Week All Occasion Challenge.


This is a sweet, blank butterfly card with a very rustic feel to it. I used the same grid pattern that I showed you in my previous post with my MS score board. Love the look of that grid and it's super easy to do!

Hope you enjoy the card- I'll be back with more posting soon I hope! Miss you guys!

Steph

SHARE THIS POST - {PINTEREST}

12.07.2010

My Cute Stamps in the house!

YAY! I got my My Cute Stamps sets in the mail yesterday and I couldn't wait to play around with them! These are super fun images and it'll be tons of fun playing around and seeing what I can do with them. Here's the first card I made with the set Elegant Birds.


I started by stamping the elegant bird cages on some patterned paper I found the other day when I was re-organizing. The paper is Making Memories Black Tie- don't think it's available anymore and I hadn't even touched it. Lovely how things get buried on my desk! LOL! Anyway, I found these super elegant, shimmery papers and stamped the birdcages on them and cut them out. Here's a close up of the different patterns I chose for the bird cages:


Very elegant, indeed.... Then, I cut a card base from PTI Smokey Shadow cardstock and made the grid pattern on the bottom of the card with my MS Score Board. The sentiment is from PTI's Fillable Frames #7 and is stamped on PTI White Shimmer cardstock. I arranged everything on the card base, adding some embroidery floss, ribbon, and rhinestones. Finally, I found a home for my super cute hot pink birdy and called it a day!

Thanks for stopping by today!

Steph

SHARE THIS POST - {PINTEREST}

12.06.2010

Teacher Gifts

Hey, everyone! Nice to see you this Monday! I've been plugging away- crossing things off my list one at a time! Trying not to get too overwhelmed this Christmas! Today I'm here to show you one of the things I crossed off my list over the weekend- teacher gifts! I made it really easy on myself and ran into Starbucks and picked up a few things- who doesn't love coffee, right? And not only did I get some great gifts, but they even gift wrapped it for me! LOL! The girl behind the counter said, "Can I wrap this in tissue for you?" and I nearly fainted! haha! YES! YES YOU CAN! Nothing easier than that! I brought it home, whipped up a couple of tags, tied them on, and teacher gifts are DONE!

Here's a picture of the gift:


Super cute Starbucks bags this year. And here's a close-up of the tag:


I used Tiny Treats: Christmas and Polka Dot Basics to make this tag. The deer is by far my favorite image in this set- he's so cute! I made a bunch of tags with him! Colored him in with my Copics and wrote a quick To and From on the back! Easy as pie!

See ya next time!

Steph

SHARE THIS POST - {PINTEREST}

12.02.2010

Live your dream....

Hi, guys! How is everyone? I'm feeling much better, but not quite 100% yet. Still getting over this cold/sinus infection. While me and my oldest, Aden, are feeling much better, my hubby and my youngest, Austin, are just now getting hit with it! I don't think we'll ever all be well again!

Busy day for me today... Aden's at school right now and me and Austin are getting ready to head out to speech therapy. After school today we are going to go try to buy Aden a new bedroom set since he's currently sleeping on the bed I got when I was ten! And his dresser just died. No better time them now I guess... lol...

Just a quick card for you today- I've been super busy working on some submissions for the current Papercrafts call- one of my big goals this year was to get published and I have to say I've been a little lazy about it! ;) I'm submitting everything I make this week... we'll see! My guess is you'll probably be seeing all of 'em on the blog-o next week when they don't get picked! LOL! In the meantime, here's a quick one I whipped up last night for you guys!


Listen... I know what you're thinking.... another YOF card..... haha! I CAN'T HELP MYSELF! I love these sets and I can't put them down. This is YOF: Mums, of course... Stamped a bunch of mums with Dark Chocolate Ink on Vintage Cream cardstock. Then, I went in and added a little color with my Tea Dye Duo in the center of the flowers and around the edge of the paper. I used my new Inkssentials Ink Blending Tool! I've been practicing away with that lately and I'm loving the soft, subtle look it gives me. I pulled out my Harvest Gold cardstock for my card base and I even gave up one of my wood buttons for this one! 

Hope you like it! See ya next time!

Steph

SHARE THIS POST - {PINTEREST}

11.29.2010

Big Announcement!


HI! I just wanted to stop in quickly and give you all a little NEWS! I recently recieved an e-mail from Holly Brooke Jones of My Cute Stamps informing me that I was chosen to be on their design team! I am very excited to work with these awesome stamps! Here is the blog post of the announcement! It looks like I am in VERY good company! I can't wait to play with these stamps!

Steph


SHARE THIS POST - {PINTEREST}

Monday, Monday, Monday

Hey, guys! How's everyone doing today? I'm having a bad case of the Monday's unfortunately! LOL! I woke up not feeling so great (sneezy, sore throat, sinus headache) and I have a fun filled day with both boys home... gonna be a long day! And they have to be quiet.... hubbie's sleeping.... worked last night... boo.

ANYWAY- enough of my rambling! Here's the violet card I promised you!


I am completely in LOVE with the Year of Flowers series. At some point I will have them all! They are such great focal images for cards and are large enough to hold their own. This violet was colored with Copic's V91, V95, and V99.  I stamped the background pattern with BB: Tin Types in Smokey Shadow ink. This is another new set of mine that I think you'll be seeing a lot of! I stamped the sentiment (from the 2009 Anniversary set) in the frame from Fillable Frames #10. Tied a sweet Blueberry Sky knot to finish it off. I'm going to go ahead and enter this one in the challenge over at Wee Memories. This week the challenge is to use ribbon- right up my alley since I use ribbon on pretty much everything!

Thanks for stopping by today! I'm going to go cuddle on the couch with my boys- probably take a nap in a little bit. I need to kick this sickness! Ugh!

Steph

SHARE THIS POST - {PINTEREST}

11.27.2010

Oh, mums....

HI! How was your holiday? Mine was so great... we spent the last few days with some great family that came to visit and got to snuggle up with my nieces for a bit! We are just hanging out today and recovering from all the activity of the last couple of days and I decided to make a quick card for the 2 Sketches 4 You challenge! Run over and check out the design team's work- such great inspiration! Here's Laura's sketch this week:


And here's my card:


Can I just tell you how much fun I'm having playing with the Year of Flowers sets! I just recently invested in some Copic markers and these flowers have been so much fun to practice with! This flower is from YOF: Mums colored with Copic markers Y32, Y35, and Y38. The sentiment is from YOF: Violets. That's another new set I've been playing with! Haha! (I'll have a violet card for ya Monday....btw.....) I used Rustic Cream cardstock for this one and paired it with some Aqua Mist and Ripe Avocado! Love the colors- they make me happy!

That's all for me today! Thank you so much for taking a look today!

Steph

SHARE THIS POST - {PINTEREST}

11.24.2010

Happy Thanksgiving!

Hey, everyone! Thanks for stopping by today! I'm super busy preparing for my absolute favorite holiday, Thanksgiving, but I wanted to pop in and share this card with you!


This is a super quick card I threw together with some scraps I had lying around. You can't tell from this photo, but the leaf is really pretty and sparkly! I stamped the leaf image from Leaf Prints with Encore Gold ink on Gold Shimmer cardstock! Very pretty in real life, I promise!

So, I have spent my whole day cooking so I can ENJOY the day tomorrow with my family! I hope you all have a great Thanksgiving!!

Steph

SHARE THIS POST - {PINTEREST}

11.22.2010

It's an ECHO PARK Christmas!

Hey! How was everybody's weekend? I had a wonderful weekend! I thoroughly enjoyed the Saturday Crop at Archiver's- it was my first time and I was in love at first sight! HAHA! I met some very nice ladies and picked up a couple new products that I have had my eye on. First, and probably most important because I've been asked to make 100 wedding invitations for a friend, I picked up the Martha Stewart Score Board. I haven't had a chance to play with it too much yet, but I've only heard great things about it! Secondly, I picked up this awesome Echo Park kit collection Everybody Loves Christmas! Super cute and steers away from the traditional Christmas colors.

So today I have a couple of Echo Park cards I made:


So this first one has very little stamping on it- I simply trimmed a piece of one of the papers from the kit- stamped a Stampin' Up sentiment (borrowed from Amanda who was sitting next to me at the crop!) and tied a bow! Super easy! And I love how all the colors come together!


The second one has NO STAMPING! I know, I know..... But how cute is that little snowman? Haha! And I love how the Papertrey Ink Distressed Dots paper works so well with this Echo Park line!

What else is in store for this Echo Park kit collection, you ask? Hmmm.... I'm thinking banners! I'm going to work on it this weekend- I'll be sure to post when it's done!

Thanks for checking in with me today!

Steph

SHARE THIS POST - {PINTEREST}

11.20.2010

Peaceful Christmas!

Hi, guys! You sick of me yet? Haha! I've been updating quite a lot lately- I hope you enjoy what you're seeing! I'm back today with another Christmas card! It seems like every time I sit down to make a Christmas card I reach for Snowflake Serenade and some Kraft cardstock! I love the rustic look of the cardstock mixed with the elegance of the sentiments in Snowflake Serenade- great match!

Here's my card:


I pulled out my new Distressed Dots Patterned Paper for this one, too! I love that paper! It's perfect for everything! I also pulled out my Library Ledger stamp set and my Tea Dye Duo to create the ledger pattern on the Mat Stack 1 die cut. The sentiment is stamped in Momento Tuxedo Black and accented with black rhinestones. A quick black satin bow finishes it off!

Hope you enjoy my card today- I'm getting ready to head to the grocery store and then come home and get ready for the Archiver's Saturday Crop tonight! So excited- it's my first time going to the store! Should be fun!

See ya next time!

Steph

SHARE THIS POST - {PINTEREST}

11.19.2010

Thank you!

Hi, there! I'm here today to share a quick thank you card with you. I made a few of these in all different colors a couple of weeks ago- so much fun! Let me say first that I am in love with In Bloom patterned paper. It's beautiful. Here's my card:


I used In Bloom Patterned Paper from PTI along with some vellum that I stamped with the frame from Fillable Frames #4 and the sentiment from Fillable Frames #5. I topped it off with some black pearls. This is a super quick and easy thank you note!

Thanks for taking a look!

Steph

SHARE THIS POST - {PINTEREST}

11.17.2010

Shutterfly for your holiday cards!

Hey, guys! I'm checking in to let you know how I'm doing MY holiday cards this year! Shutterfly is having an awesome promotion for bloggers! If you have a blog, click here and sign up for their free holiday cards program! 

I LOVE Shutterfly! I have been using them to store and print my photos for a while now and I'm super excited to order my holiday photo cards from them this year. If you're anything like me, you always wait until the last minute and get stressed out over getting all the cards out on time- not this year! I'm ordering a super cute photo card with some pictures of my boys and I'll add little embellishments here or there myself! Super easy!

Not only do they print photos in many sizes and have hundreds of card designs to choose from, but they also have great photo books and gift ideas to choose from!

Here are some great things to check out at Shutterfly:
 While I can't possibly show you the card I chose for our Christmas card- I can show you a couple I like!


So if you're looking for a easy and stylish way to send greetings to your loved ones this Christmas- definitely check out Shutterfly!

Thanks for stopping by!

Steph

SHARE THIS POST - {PINTEREST}

Butterfly Note Card

Hey! I'm here today with another card featuring patterned paper for the challenge at Wee Memories! You have until Friday to play along- so go check it out!

Here's my card:


This is a cute little note card with a couple of my favorite things: Ocean Tides cardstock, Library Ledger Patterned Paper, and my new Martha Stewart butterfly punches. I also used some In Bloom Patterned Paper for the butterflies. Love it!

Short and sweet today- hope you like it!

Steph

SHARE THIS POST - {PINTEREST}

11.16.2010

Very first Christmas card of the season!

Hey, everyone! I'm here today with my very first Christmas card of the season! I know.... I'm such a lazy papercrafter, I have really been putting it off..... I made a lot of Christmas cards last year! LOL! Anyway, I'm making a commitment to make more Christmas cards- no more procrastination! Here's the card:


For this card- I pulled out my new Vintage Ornament Dies, Distressed Dots Patterned Paper, and some Vintage Cream Felt. Very simple... just the way I like my holiday cards! I'm entering this card into the challenge over at Caardvarks, which is to use holiday die cuts! FUN! I'm also entering it into the challenge at Wee Memories, which is to dust off that patterned paper! Super fun challenge for those like me that almost NEVER touch the piles of patterned paper they're hoarding (and by hoarding I mean saving for something very special.... hehe...). 

Thanks for taking a look today!

FYI: If you're interested in the recipe for the yummy pumpkin cream cheese swirl pie from my previous post, it has been added to the bottom of the post! Just scroll on down!

Steph

SHARE THIS POST - {PINTEREST}

11.13.2010

Birthday Wishes.... and PIE!

Edited: Recipe for Pumpkin Cream Cheese Swirl Pie at bottom of post!!!

Hey, guys! I'm just stopping in today to share a card that I made for the challenge at Off The Wall Craftiness! If you haven't had a chance to see this challenge, hop on over and take a look! Here is the inspirational photo this week:


I LOVE these colors and chose to work with Papertrey Ink's berry sorbet, spring moss, and vintage cream.
Here's the card:


I tried out Maile Belles flower that she shared on her blog here. Very cool new technique and a lot of fun! The rest is pretty simple- Polka Dots Basics stamped with spring moss ink on vintage cream cardstock, a strip of vintage cream felt cut with my medium scallop die, and a leaf sprig to accent the flower.

Here's a glimpse of what else I did today.....


This picture does not do it justice.... this is my practice pie for Thanksgiving.... pumpkin cream cheese swirl pie..... amazing...... I'm gonna go have some now!


Recipe: Pumpkin Cream Cheese Swirl Pie

1 refrigerated pie crust (I like the Pillsbury one, I take shortcuts wherever possible! It's a good one!)
1 cup sugar
3 Tbsp flour
11 oz. cream cheese
1 tsp ground cinnamon
1/4 tsp ground ginger
1/4 tsp ground nutmeg
3 eggs
1 (15oz) can pumpkin
1 Tbsp milk

1. Heat oven to 375 degrees F.
2. Place pie crust in 9-in glass pie plate- I used a deep dish pan. Bake crust 8 minutes or until light golden brown.
3. Beat sugar, flour, and cream cheese on low until smooth.
4. Reserve 1/2 cup cream cheese mixture in small bowl.
5. Add remaining ingredients except milk to mixture. Beat on medium speed until smooth.
6. Pour into crust.
7. Stir milk into reserved cream cheese mixture.
8. Spoon cream cheese mixture over pumpkin mixture and create marble design with a butter knife.
9. Cover edge of crust with 2-3 inches of foil to prevent browning (remove foil last 15 minutes of baking).
10. Bake 35-45 minutes.
11. Cool 30 minutes.
12. Refrigerate 4 hours before serving.

This was truly a delicious pie- and not very hard at all! Let me know if you give it a try!

Thanks for stopping by!

Steph

SHARE THIS POST - {PINTEREST}

11.12.2010

Happy Birthday Banner!

Hey, everyone! Thanks for stopping by today! I'm here with a cute little birthday card using PTI's Fly Away set. I'm entering it in the challenge over at Wee Memories- take a look! You still have a little bit of time to play along if you want!

Here's my card:


For this cutey I used one of my favorite color combos: pure poppy, spring rain, white, and black. I stamped the background grid pattern with the Library Ledger grid stamp. Then, I stamped the solid plane from Fly Away with Pure Poppy ink and cut it out. The sentiment and banner were stamped in black and adhered with foam tape. Finished it off with a simple knot with black satin ribbon.

So... I'm trying to get my Papertrey order together for release night and I'm sooooo sooooo excited about the In Bloom dies! I use In Bloom a lot and this will be an awesome tool for me! What are you excited about this release? YAY for money to spend on PTI, right!?

Thanks for popping in! Have a great day!

Steph

SHARE THIS POST - {PINTEREST}

11.10.2010

Happy Birdy Day! Laura's Sketch #65

Hey, everyone! I'm here to share a card I made for Laura's Sketch #65 at 2Sketches4You. I'll get right to it- here's the card:


I pulled out a new set that hasn't seen any ink yet for this one! The little birdy is from Unity's Could I Be Any Cuter? set! Such cute images in that set and I picked it up for a bargain! I colored my little birdy with B41, B45, and B37 Copic markers. The sentiment "happy day" is from Papertrey Ink's Fillable Frames #5. I also pulled out my Polka Dot Basics II Impression Plate and my Medium Scalloped Border Die.

This card is also available in my ETSY SHOP!

Have a great day!

Steph

SHARE THIS POST - {PINTEREST}

11.09.2010

Birthday Bash!

Hey! I'm here today with a fun little card for the Wee Memories Challenge #30! This week they are celebrating their blog birthday over there and I am very happy to play along! I had a lot of fun playing around with some ribbon to make this card!

Here it is:


I used the very cute Library Ledger Patterned Paper and Vitage Cream cardstock for this card. The flower embellishment was made by adhering together a bunch of small circles, which was then cut with my 1 3/4" circle punch. Then, I looped around some vintage cream and aqua mist ribbons as well as some rustic jute button twine. I masked off an area to create a flower stem and stamped the stem with BB: Woodgrain. The leaf is hand cut. I love the look of this card- very FUN!

FYI: this card is available for purchase in my ETSY SHOP!

Thanks for stopping by today!

Steph

SHARE THIS POST - {PINTEREST}

11.07.2010

Diggin' on Damask

Hey there! I'm here this freezing cold Sunday morning to share with you a card for the Diggin' on Damask challenge over in Moxie Fab World. I do not currently have the coveted Papertrey Ink Damask Designs set by Dawn Mcvey **gasp**, but it is high up there on my wish list and I hope to get it soon! So, I went searching in my stash for some damask and found my Hero Arts cling Antique Brocade! Beatiful pattern- perfect for what I was going for with this challenge!

Here's the card:


First, the point of the whole challenge, Hero Arts Antique Brocade stamped with Smokey Shadow ink on SS White cardstock. Love it. Sentiment from PTI YOF: Roses embossed with white detail embossing powder on Smokey Shadow cardstock. Love it. YOF: Roses HUGE rose, colored with copic markers R20, R22, and R24. CAN'T STOP LOOKING AT THE ROSE! I love coloring this image!

This card is also available for purchase in my ETSY SHOP!

Thank you so much for stopping by today- have a great Sunday, everyone!

Steph

SHARE THIS POST - {PINTEREST}

11.06.2010

2S4Y Kazan #65

Hey, folks! Thank you so much for stopping by today! And hello to all my new followers! I'm so excited that you are taking an interest in my blog and fully anticipate updating much, much more frequently than in the past! So... here's todays card...

I'm joining in over at 2Sketches4You today for Kazan's Sketch #65! I've really enjoyed playing around with their sketches and I was even included in the Fab 5 last week! WOO HOO! So, here is this weeks sketch!


And here is my card based on the sketch....


I LOVE this card- there is something so warm and cozy about the color combination. I have been loving the combination of gray and cream together, so that it what I went with here. All products used are Papertrey Ink. I used Vintage Cream and Smokey Shadow to create the base and mat image of the card. The mat image is stamped with BB: Text Style. Then, I pulled out my brand spankin' new Fine Linen felt..... love it...... and cut it with my Mat Stack 1 die. The focal image is from this years anniversary set Round and Round.

Hope you like my card today.... time for me to get some coffee and cozy up on the couch with the kiddos!

This card is available for purchase in my ETSY SHOP!


Steph

SHARE THIS POST - {PINTEREST}

11.03.2010

Fill this day with joy...

Hi, everyone! Just stopping by tonight to say "hey" and show you this card. I made it for the CARDS publication call, but I never got around to submitting it... lol! Oh well, more to post here on the blog-o! I'm also submitting this one to Wee Memories for the "Free For All" challenge.


This one uses Hero Arts Butterfly Field cling stamp with Papertrey Ink Aqua Mist ink. I also used the Papertrey Ink medium scallop die on this one- I love that die! So great! A few touches of Plum Pudding and the card is complete! Thanks for taking a look!

P.S. Sorry for the dark picture- I hate taking photos at night... boo..

This card is available for purchase in my ETSY SHOP!

Steph

SHARE THIS POST - {PINTEREST}

10.30.2010

Trying some challenges on for size...

Hey! I'm back today with a card for a couple of challenges! I recently made the decision to more actively create and blog- and this is one of the ways I'm doing it. I'm going to start participating in a lot more of these over the next couple weeks so watch out for some more regular updates over here! YAY! So... on to today's card, shall we...


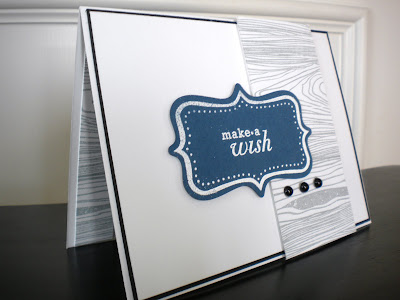
Today I am participating in the challenge over at Caardvarks where the challenge is to create a card both inside and out! I had to whip up a card for my brother-in-laws birthday so I went ahead and made his card to meet this challenge. This card also meets the challenge over at Wee Memories. This week is a "Free for all" week- so anything goes! Make sure to check out these fun challenges and play along!


Here's the card:


The card is made primarily with Papertrey Ink products. First I stamped BB: Woodgrain with Momento London Fog ink and cut a strip to use as a accent piece on the front of the card. Then, I used Fillable Frames #4 and Mega Mixed Messages to create the focal image which is heat embossed with white detail embossing powder.


And I added some strips of the same woodgrain stamped paper to the inside of the card to bring it all together.


Thanks for taking a look today!

Steph


SHARE THIS POST - {PINTEREST}

10.29.2010

2S4Y #64

Hi, guys! Checking in today with a card for Laura's sketch at 2 Sketches 4 You! Check it out and play along- it's a lot of fun! Today's card definitely celebrates fall- my favorite season! The leaves are finally starting to change here in North Carolina and I was inspired by all the beautiful colors!


All the products used on this card are Papertrey Ink. I started by stamping my own pattern using the Leaf Prints stamp set on kraft cardstock. I used the medium scallop die and vintage vanilla cardstock to create the border. A little vintage cream twill, some terracota tile cardstock, and a sentiment from Fillable Frames #7 finish off the card! Thanks for taking a look today!

This card is available for purchase in my ETSY SHOP!

Steph

SHARE THIS POST - {PINTEREST}
 
SITE DESIGN BY DESIGNER BLOGS