Showing posts with label Papertrey Ink. Show all posts

7.22.2013

FOR SALE: PTI Dies and Impression Plates!

Hi!
If you follow me on facebook HERE or HERE, you may know that I'm saving my pennies for a sweet new camera lens! I'm clearing out some of crafty stuff that I love, but don't really use very much anymore! I've listed a bunch of PTI Impression Plates and Dies at AWESOME prices!


Here's how it's gonna work-

1. Send me an email at sweetsteph612{at}yahoo{dot}com listing the plates and dies you would like to purchase and your shipping address.

2. I will send you an email back confirming what is still available and the final cost of your order.

3. Shipping will be a flat rate of $3 within the US, If you're international, I'll check and see how much shipping will be and let you know the exact cost via email before purchase.

4. I'll be accepting payment via PayPal- once the payment comes through, I'll ship!


Here's what I have for sale-
 
Impression Plates
Tin Types $10 (retail $16)
Polka Dot Basics II $10 (retail $16)


Dies
Peace Be Still (3 dies) $5 (retail $9)
Mat Stack 3 $4 (retail $7)

Butterfly $3 (retail $5)
Picket Fence $3 (retail $5)
Buttoned Up #1 $3 (retail $5)


Stamps + Dies
Fillable Frames #11 (stamp set + die) $6 (retail $10)
 
 
Happy shopping! :)


SHARE THIS POST - {PINTEREST}

12.15.2011

Hi-Ya Play Date Cafe!

Hey!

I promised I'd be back with another "misted" card and here I am! And what do you know? The card I made fits the new challenge at The Play Date Cafe perfectly! Don't ya love it when it works out like that! 

Here's the challenge:


And here's my card:

 
Ooohhh... I LOVE a good color splash challenge! One of my faves! 


This card is SUPER clean and simple- the base is beautiful Shimmer White cardstock from PTI- love that stuff. The top layer is White cardstock that I masked before misting the bottom section with Mister Huey's Bluegrass and Heirloom Blue mists. I added a quick spray of Calico Shine on top to give it a little shimmer! 


Then, I removed the mask, stamped the sentiment, tied some Charcoal twine from The Twinery around the layer, and adhered it to the card base with foam adhesive! 


Thanks for stopping by today! 


{Hi-Ya! Supplies}


SHARE THIS POST - {PINTEREST}

12.14.2011

CAS-ual Fridays Misting Challenge!

 Hi, there! How is everybody!


I've been running around trying to pull everything together for Christmas and it seems like I've neglected the blog-o a bit! Sorry about that!


I'm here today to share a card that I made for the CAS-ual Fridays challenge this week! This week is all about MISTING so I broke out some of my new Studio Calico Mister Huey's mists and went to town!


Here's the challenge:


And here's my card:


I just LOVE the textured look you get from mists! So fun to mix different colors to create a funky background! Here, I stamped Market Street Stamps' new background Mesh in Pumice Stone Distress Ink and then misted the whole panel with three different mists: Bluegrass, Dewey, and Estate Green! Love mists so much.... in fact, I love them so much that I'll have another misting project for ya tomorrow! See ya then!


{Thinking of you supplies}


SHARE THIS POST - {PINTEREST}

10.31.2011

CAS-ual Fridays Sketch Challenge!

Hi, everyone! So nice to see you today! 


Before I share my card for this weeks CAS-ual Fridays challenge, I would like to send out a BIG thank you to all my cheerleaders! I was BEYOND surprised to see my name on the list of World Card Making Day winners and it still hasn't really set in. Thank you all for your congratulations and well wishes- the day that package arrives on my doorstep will be an AMAZING day, but honestly, just seeing my name on that list with all those super talented ladies takes the cake. So THANKS!


Now on to the CAS-ual Fridays challenge for this week! This week is a sketch challenge:


CFC26 Project Gallery


I love to use sketches as a jumping off point so I thought I'd play along this week! Here's what I came up with!


Very soft and subtle- I really like how this one came out. LOVING the new Memorandum collection from lily bee- soooo pretty! And I can't stop making hexagons- the Sizzix Hexagon die makes it too easy... lol! I colored the rhinestones with my Copics to coordinate with the papers. 


Thanks for stopping by today! I'll be back on Wednesday with a new Market Street Stamps Paint the Town Challenge! You're not going to want to miss it!


ALSO... please keep Katie Renz in your thoughts and prayers- she isn't doing very well- here's the latest blog post from her amazing husband, Kevin: KATIE


{Thinking of you} Supplies:
(not linked: Papertrey Ink 2010 Anniversary Set- Botanical Silhouettes)


SHARE THIS POST - {PINTEREST}

10.01.2011

Happy World Card Making Day!!

Well hello there!
I hope you're all enjoying a fun day full of crafting! Me and the boys are enjoying our Saturday and then when they go to bed it'll crafty time for me! I can't wait to get started on some entries for the Paper Crafts World Card Making Day contest! Entries must be postmarked by October 11th so I need to get my butt in gear! There's a fab prize involved, you know!


Click HERE for more details on the contest!

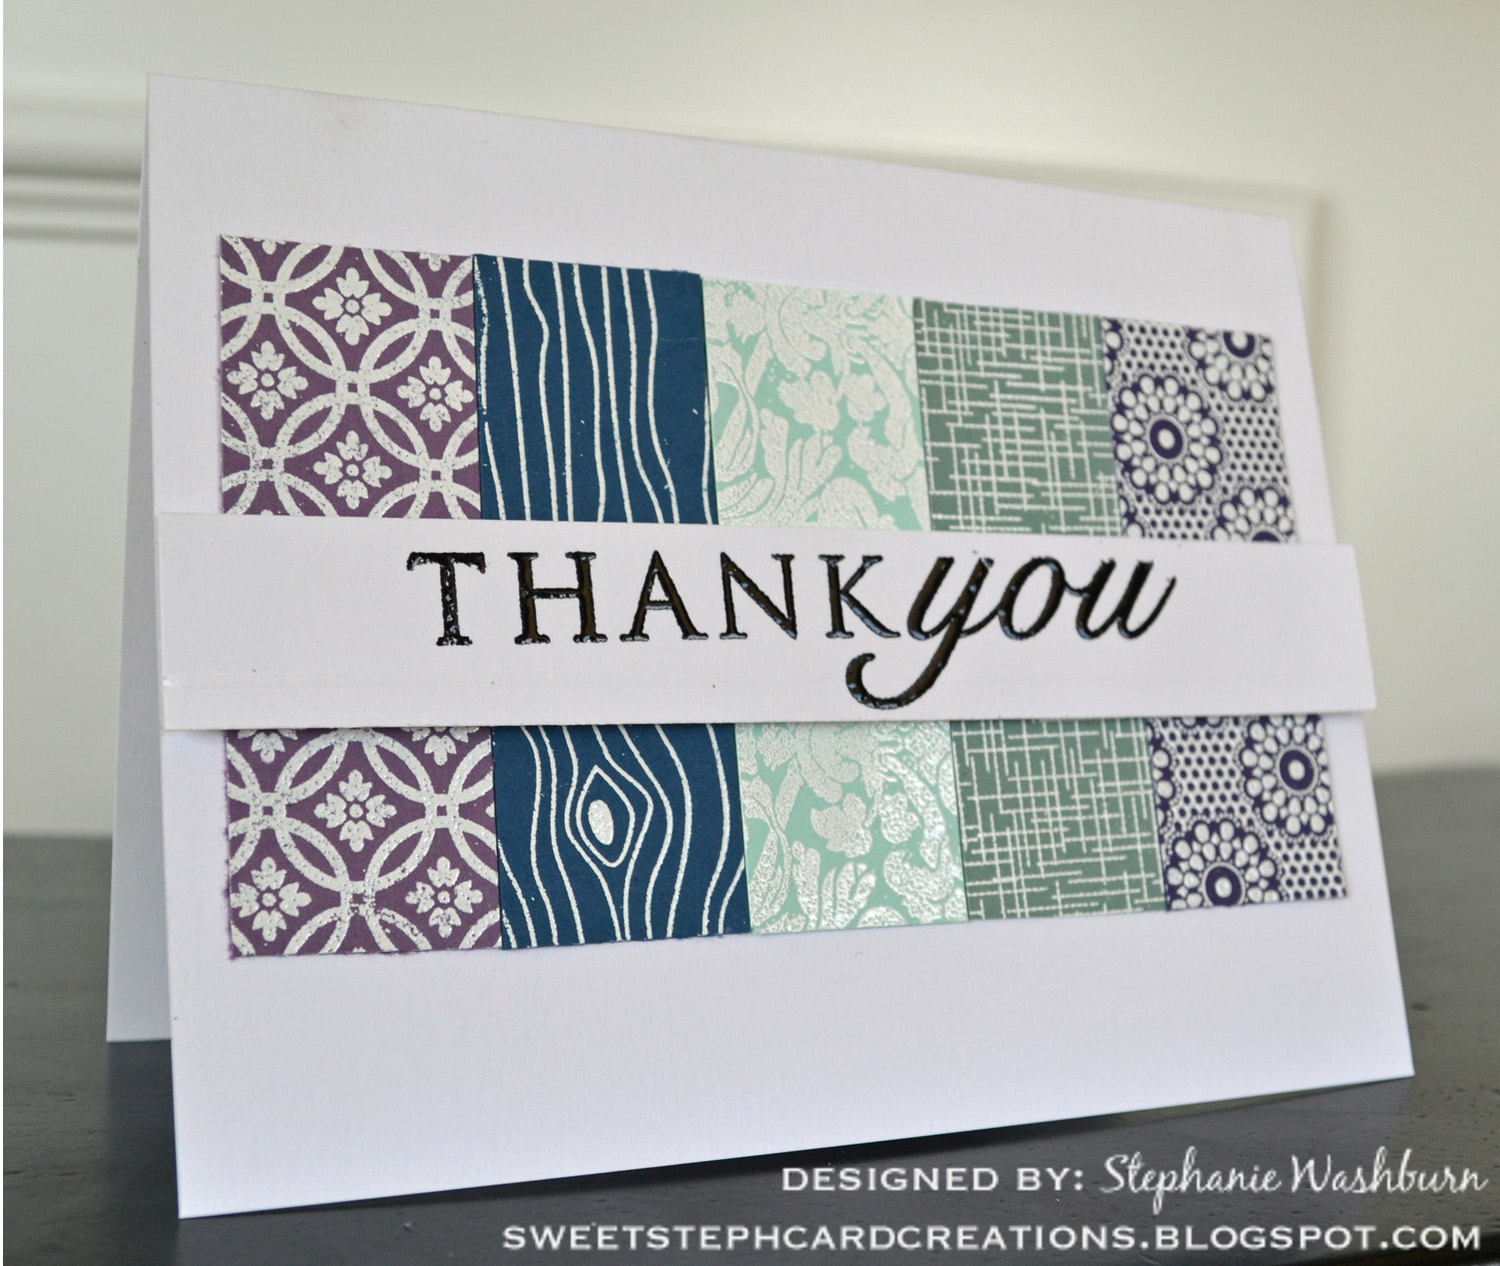
Here's the card I made for you:


Just wanted to send a big THANK YOU to all of you who stop by and visit my blog week after week. Your sweet comments and encouragement keep me going and YOUR blogs and projects give me so much inspiration! I honestly don't know what I would do without you guys- I learn so much from each of you everyday! So... THANKS! You're the best!

For this one I pulled out some of my favorite background stamps from Market Street Stamps! I know I sound like a broken record, but you NEED to try these stamps- they're amazing! And there are so many fun sets to choose from! The backgrounds are especially fun and I love playing with them and discovering fun new ways to use them.

Today, I took five different colors of cardstock and five different background stamps and heat embossed them with white embossing powder. I taped them all together in a strip and adhered it to the card front. Super clean, simple, and EASY. Then, I heat embossed the sentiment from PTI with black embossing powder. To finish it off, I added some score lines under the sentiment for interest. Added the sentiment strip with foam tape and called it done! 

Thank you so much for stopping by today! I'm off to check out all the amazing projects linked up on the Paper Crafts World Card Making Day Blog Tour! Hop along with me for TONS of inspiration!

{Thank You} Supplies:


SHARE THIS POST - {PINTEREST}
 
SITE DESIGN BY DESIGNER BLOGS